Disclosure: Pull & Pour received this product free of charge to review for this post. I received no other compensation and as always, all opinions are 100% my own.
About the Flair Signature Espresso Maker
Flair makes manual, lever-press espresso makers that allow you to make high-quality espresso at home. Their espresso makers come in four versions: NEO, Classic, Signature and Pro. The model reviewed here is their third-tier option, the Signature.
While there are price and feature differences between each model, the core mechanics between all three models is very similar. In this review I’ll be focusing on the Signature model I tested, but much of the review would carry over to the other models as well.
First Impressions and Unboxing of the Flair Signature Espresso Maker
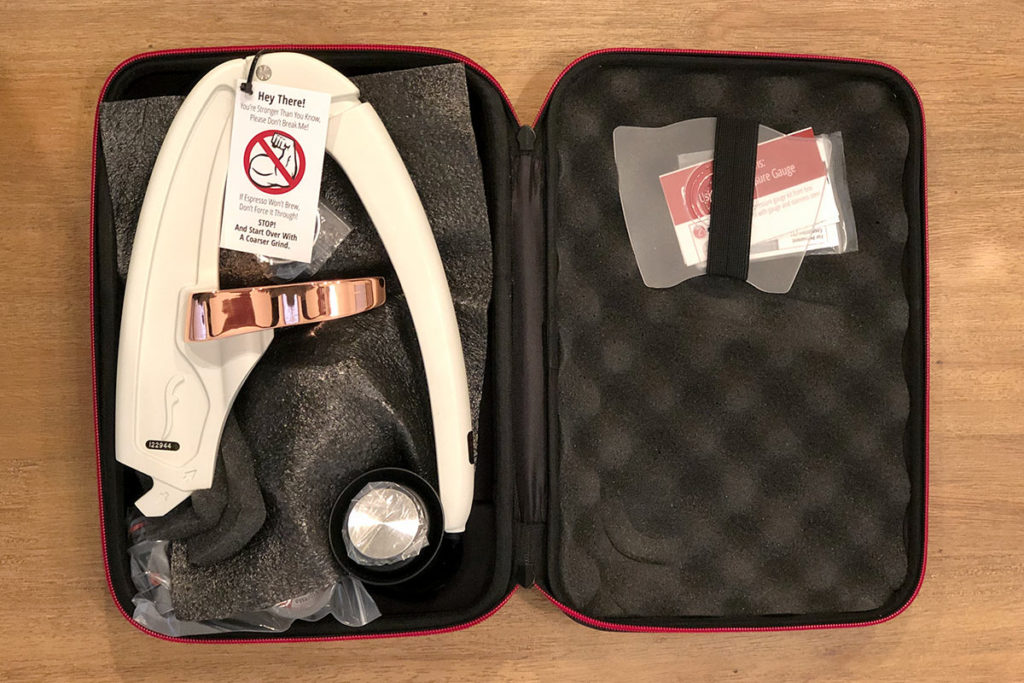
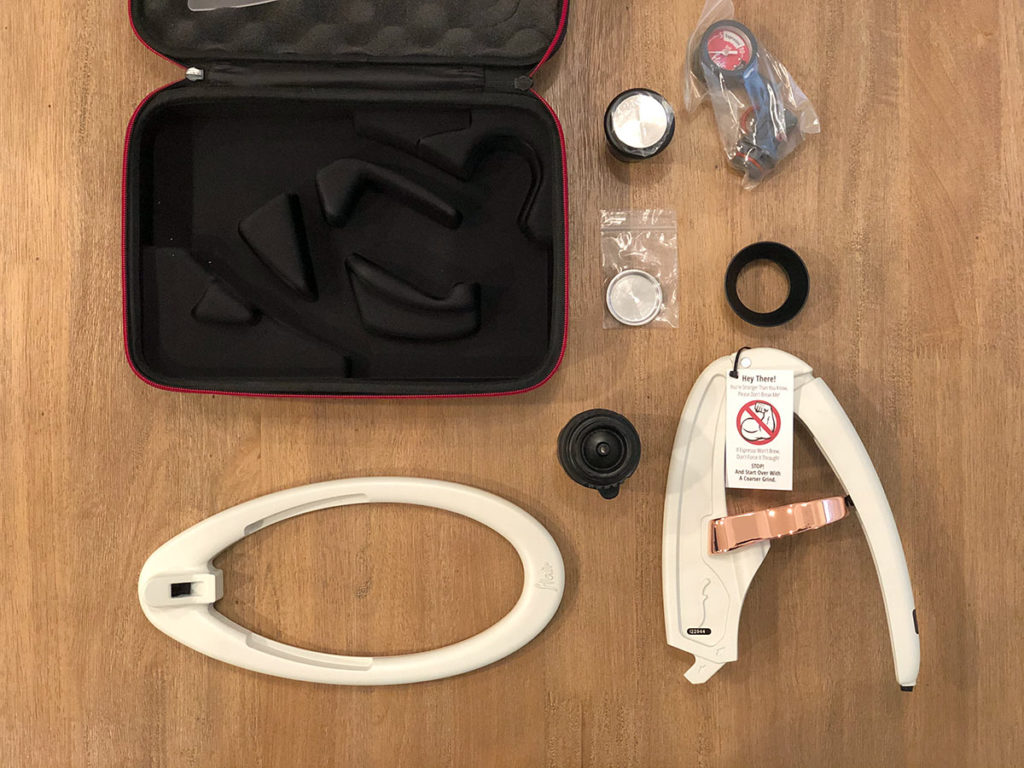
Inside the outer box, the espresso maker comes tightly packaged in a clean and simple, black carry case. Within the case comes:
- The base (matte white in my model)
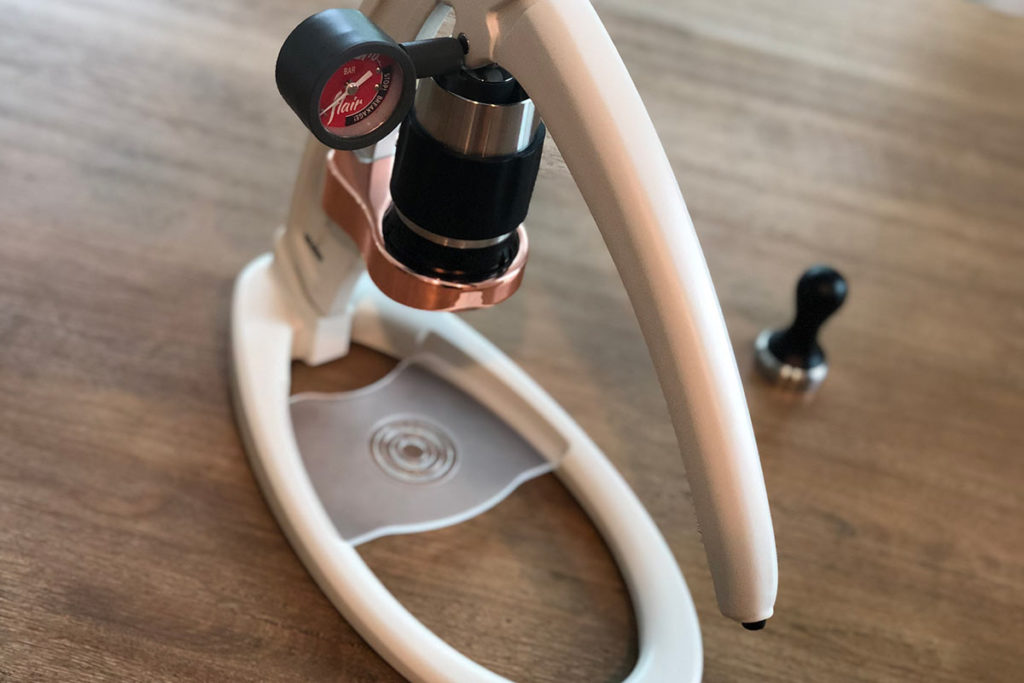
- The post & lever (matte white in my model) with copper-plated portafilter base
- Pressure gauge, stem, stainless steel plunger and pressure gauge guard
- Bottomless 2-in-1 portafilter
- Stainless steel dispersion screen
- Brewing cylinder
- Dosing cup
- Funnel
- Drip tray
- Stainless steel tamper
- Brewing Guide
- Screw to connect base and post permanently
All of the pieces are high-quality and beautiful. Given the large number of items included, it initially felt a bit overwhelming to figure out what was what, but the brew guide clearly documented it all.
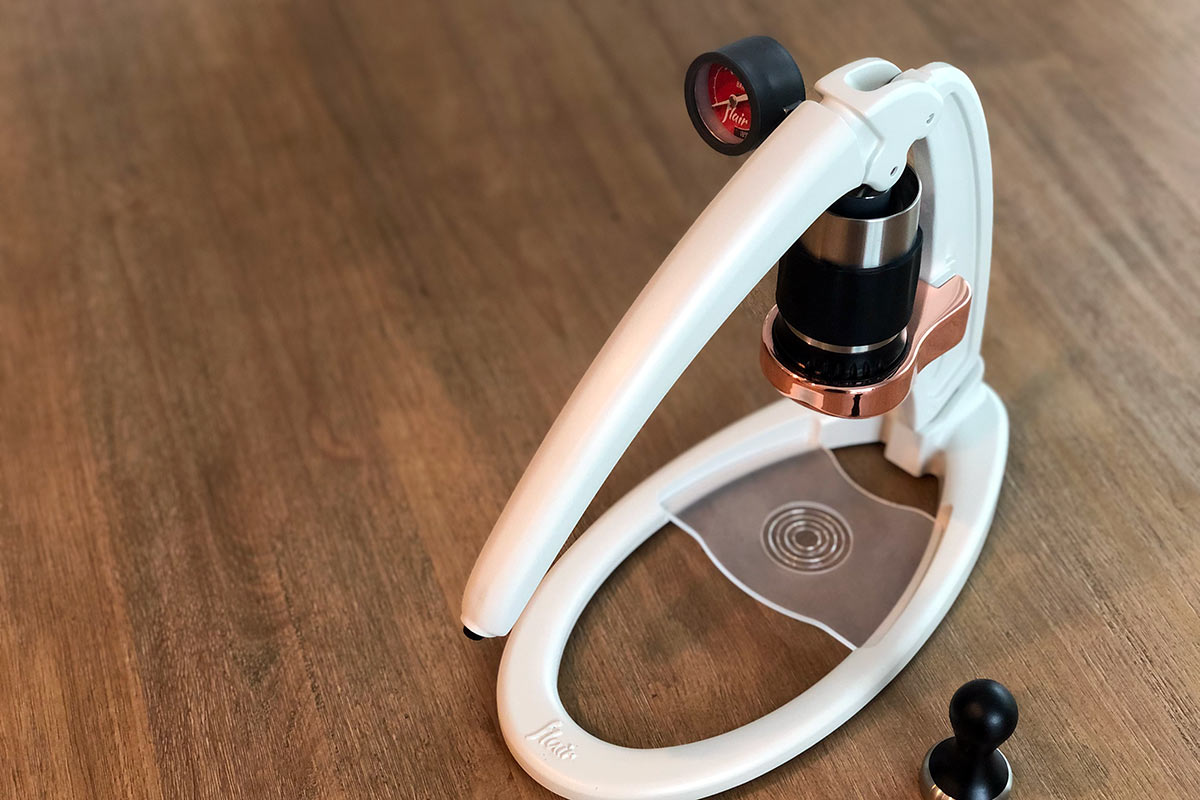
After easily putting everything together, I had two initial thoughts: 1) this would be so easy to travel with, 2) this would be a great countertop brewer with its sleek look and small counter footprint (6.5 inches x 12.5 inches).
Cost
The Flair comes in a variety of styles that range from $119 (NEO) to the Pro 2 ($309). This model in particular (Signature) costs $239. While this still is a lot of money, it is competitive with other similar manual espresso makers on the market and much less expensive than any of the automated machines (at least machines that make equivalent quality of espresso). The ROK, another manual espresso machine ranges from $189 – 199 (though it has a very different set of included elements, so it is difficult to compare them apples to apples). For any decent automated espresso machine, you’ll easily pay a minimum of $350 (and usually $600+), so compared to other higher-end at-home espresso options, the Flair models are quite affordable. Especially for a model like the NEO and Classic, you’d be hard-pressed to find a more affordable home espresso maker.
Quality
It is clear from just looking at the Flair that it is well-made and of high-quality. The frames on all models are die-cast aluminum. The cylinders, plungers and dispersion screens are all stainless steel. The basket inside the standard portafilters (NEO, Classic, Signature) and the entire portafilter on the PRO 2 are stainless steel as well. Many of the other components are high-quality polyacetal or polycarbonate.
Ease of Use
If you are new to espresso and some of this seems overwhelming, check out Flair’s latest model, the NEO. It offers a pressurized portafilter, which helps you pull a great shot of espresso even if you don’t have the grind and coffee amount honed in exactly as it should be.
There is no doubt there is a bit of a learning curve with the Flair. If you’ve never made espresso before—or even if you have—you’ll need to take some time to read the directions, practice a bit and get used to how the Flair works. Once I got over this initial learning curve though, I found the Flair really easy to use (I’d compare the difficulty to making pour over coffee). It takes less than a minute to setup or break down and once you’ve honed in your grind settings, coffee amounts and gotten used to what piece goes where, it really is very simple.
Andrew from Flair also offers weekly Zoom classes to new customers where you can learn a bit more about how it works and get some tips (these classes are only available for customers who have purchased direct from Flair’s website—not Amazon or other sales channels).
Note: It is important to note that making espresso in any espresso maker, including the Flair, requires some work to dial in on the proper dosing and grind settings. These variables change based on the type of coffee used, how old the coffee is, the roast level of the coffee and more. This sort of dialing in should be expected regardless of the espresso maker you use.
Durability
While I wouldn’t go around dropping the Flair (I think that goes without saying for any piece of coffee equipment), I think you’d be hard-pressed to actually break the core components. They are extremely well-made and are very sturdy (die-cast aluminum, stainless steel, etc.). Even the plastic components on the lower-end models appear to be fairly solid and would be hard to crack or break.
The Flair also comes with a travel/carry case, which gives it extra protection and reduces the likelihood of it breaking in any way.
The one area other products I have tried have fallen short in durability in the past are seals. Flair has a variety of red o-rings that create the tight fit required to pull a shot of espresso. My concern here may not be legitimate though. Each o-ring has been rated for tens of thousands of actuations and able to withstand temperatures exceeding 400 Fahrenheit. In speaking with Flair’s team, they also said they have not had any report cases of them twisting or tearing, so the concern may not be founded.
Appearance
All models of the Flair are really nice looking espresso makers. From the copper chrome portafilter base to the sleek black or white body (colors are slightly different with other models), the Signature is one attractive piece of equipment. While they easily collapse into their travel case, they are a brew accessory you are proud to have on your counter top.
Value
As I mentioned in the cost section, the Flair is one of the most affordable ways you can make high-quality espresso at home. It offers one of the best values I’ve found in the “money spent to quality of espresso” equation.
One thing to note about the Flair is that it does require additional equipment to work to the best of its ability:
- Kettle: You’ll need a water source and a way to heat the water. Ideally if you have another kettle for pour over coffee or tea, you could re-use that.
- Scale: To make the best espresso, you’ll need to measure out your coffee.
- Grinder: While you could use pre-ground coffee, that rarely works for espresso. To achieve any decent crema on a shot, you need to grind the coffee on demand. Many grinders work great for pour over, but may not have the precision or be able to get fine enough for espresso. (If you don’t have a grinder that will work well for espresso, you may want to look at the NEO, which has the pressurized portafilter and will help you create good shots even with coffee that isn’t perfect for espresso)
Making Coffee with the Flair Signature Espresso Maker
The next four areas focus on the actual brewing process with the Flair and the quality of the final result—the espresso that you drink. Below is an overview of the brewing instructions for the Flair espresso maker (be sure to watch the video above to see these steps in action).
Time needed: 5 minutes
How to make espresso with the Flair espresso maker.
- Prepare the Flair for brewing.
Insert post into base, place drip tray onto base and take apart the brew head.
- Measure and grind your coffee.
Weigh out and grind 12-18 grams of coffee at espresso fineness.
- Pour coffee into portafilter and tamp.
Attach the funnel to the portafilter, pour your coffee grounds into the portafilter and tamp lightly (create a flat, compact and level bed of grounds).
- Remove the funnel, place the portafilter on the post and add the screen.
- Prepare the brew head.
Insert plunger at the top of the brew head. Preheat the brew head (see comments below) and then place the brew head onto the post on top of the portafilter and screen.
- Make the espresso.
Add a cup or shot glass under the portafilter. Add near boiling water to the plunger until the fill line. Add the gauge stem to the top of cylinder, lower the lever slowly.
A few additional comments:
- When tamping, push down with the thumb and forefinger of both hands (to apply even pressure) until the coffee grounds start to push back a bit.
- To get the plunger up to temperature, you’d have to fill it with boiling water multiple times. A tip I learned from Flair is to use the steam from your water kettle to pre-heat the plunger instead. Stick the plunger cylinder on top of your kettle at the steam holes while you setup the Flair and it will be ready to go by brew time. I also end up using boiling or near boiling water (vs. what I’d usually use at 5-7 degrees cooler) knowing that some of the water heat will transfer to the plunger before brewing.
- Brew time should be 35-45 seconds at 6-9 BAR if grind and dose are correct.
Brew Speed
Once you become familiar with the Flair, I’d estimate the entire process of pulling a shot takes less than five minutes—one to two minutes for setup, thirty seconds for pulling the shot and two to three minutes for cleanup. If you have the machine all assembled, you could likely be finished from beginning to end in less than four minutes.
As I mentioned in the “Ease of Use” section, one thing to consider with making espresso with any machine is the time it takes to dial in your shot. With every new coffee, you’ll likely need to pull a few shots to dial in on the perfect coffee amount and grind size.
Brew Quality
As mentioned above, the Flair does take a little time to get up to speed and does require some dialing in to pull a perfect shot. Once you do that though, the quality of espresso you can get with the Flair is as good as any other espresso you can make at home—and rivals what you can get at café as well.
Differentiation
There are a few other manual espresso makers on the market (ROK, La Pavoni), but not many. Flair products (especially the Signature, Classic and NEO) do hit a unique market with their products: high-end coffee/espresso lovers that don’t want to spend a fortune to make high-quality espresso at home. The Flair is one of only a few products that can deliver top quality espresso under the $300 mark (at least that I’m aware of)—some of their products even falling under $200.
Flexibility
The standard brew head found on the Classic and Signature models does fall a bit short when it comes to flexibility. It really offers a narrow range of the type of coffee you can make—12-18 gram shots of espresso. That is by design though, so it isn’t necessarily a flaw of the product. It also does allow you to make both standard espresso and cold-pressed espresso (essentially making espresso with cold water), which is a nice feature and not something usually possible with espresso machines.
Note: The Pro model does have a slightly larger basket and can pull 16-22 grams of espresso in and up to 56 grams out.
The Bottom Line
I have been incredibly impressed with the Flair espresso maker as I have used it regularly over the four to six weeks. It is a joy to use and consistently delivers great shots of espresso. At the end of the day, I think the Flair is the perfect espresso maker for coffee lovers who:
- Want to dive into the specifics and intricacies of espresso. To get the most out of the Flair, you’ll need to dial in your grind and dose settings. I find that to be part of the fun, but if you’re used to making coffee with the click of a button on your Keurig and want a similar experience with espresso, the Flair isn’t for you. If you love refining your pour over process and getting everything just right for your perfect cup of coffee and looking to carry that passion to espresso, buy the Flair now.
- Want an espresso maker that is portable. I never thought I’d be able to make espresso when traveling, but with the Flair that has become a real possibility. Between the Flair and my 1Zpresso hand grinder, I have almost all I need to make great espresso from anywhere.
- Are on a budget. Manual espresso makers are a bit more work, but are a lot less expensive than their automatic counterparts. If you want the highest possible espresso for the lowest price, the Flair product line is a great place to look.