I love the AeroPress (check out my recent post for my reasons why). After using it day in and day out over the course of years, I’ve given a lot of thought to ways to improve my AeroPress brews. Here are six, easy-to-implement tricks I’ve found to instantly improve the coffee you make with the AeroPress.
1. Align Your Brew Parameters to Your Recipe
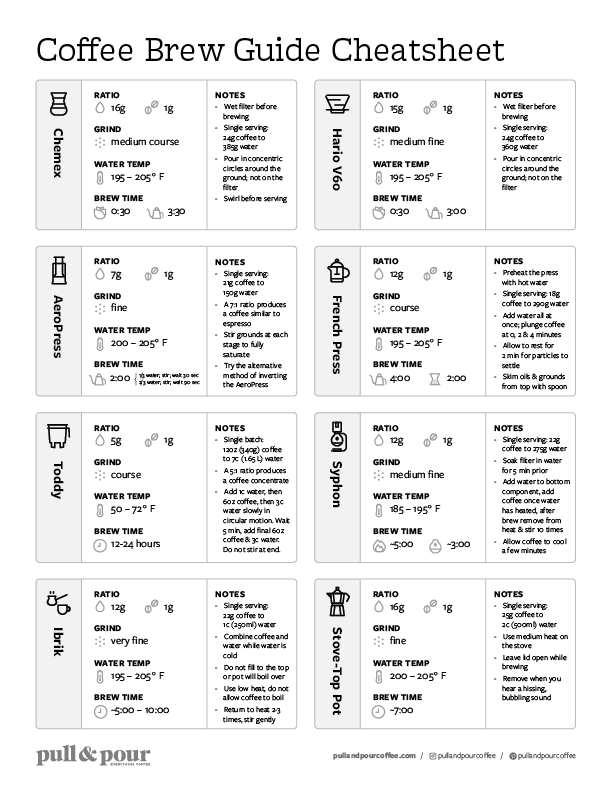
The AeroPress is an extremely versatile brewer that can make a wide range of coffee. When exploring various recipe styles though, you need to be sure to adjust your brew parameters (brew water, brew time, grind size, etc.) with the recipe. If you have questions about what is “right” for the style of coffee you are making, be sure to check out the free grind guide cheatsheet and the free beginner’s brew guide cheatsheet which both have tons of helpful information when looking for specifics for brewing with the AeroPress.
2. Stir Back & Forth vs. Round & Round
To have the most evenly extracted brews with the AeroPress (in other words, the most delicious tasting cups), you want to keep your coffee grounds evenly saturated and perfectly flat. To fully saturate your coffee grounds, it is common to stir in the middle of your brew at some point. The circular stir is the most common, but I have found it can lead to a dome-shaped bed (and can result in uneven extraction). A back and forth stir works better to quickly wet the coffee grounds, but not allow the grounds to set in a dome-shaped bed. (Thanks to Jonathan’s Gagne article, Reaching Full Flavor Profiles with the AeroPress, for first introducing me to this).
Want an easy way to discover amazing coffee?
Check out the free Pull & Pour Coffee Club to receive a weekly text with one of my favorite coffees at the moment straight to your phone. Check it out
3. Double Up Your Filter
Adding two filters during your brew is one of the easiest hacks with the AeroPress. Using a double filter has two main benefits: 1) It can create a cleaner final cup of coffee, and 2) can slightly prevent unwanted dripping during brewing because of the thicker paper.
4. Insert Plunger During Brewing
One of the downsides to brewing with the traditional or upright method on the AeroPress is that water can drip through the filter prematurely. One way to solve this is by brewing inverted (flipping the AeroPress upside down during brewing). Another option that solves the problem and allows you to keep the AeroPress upright is to insert the plunger into the chamber body during brewing. It allows a very little bit of water to get through the filter when you do this but quickly creates a vacuum within the chamber that prevents any additional water from dripping through.
Inserting the plunger during brewing also helps maintain heat in the chamber during brewing. The AeroPress is very good at heat retention, but the opening at the top is always where it loses the most heat. By adding the plunger to the top you prevent a lot of heat from escaping during the brew.
5. Experiment with Longer Brew Times
The “traditional” brew times for the AeroPress range from 1-3 minutes. While you can get some extremely tasty cups of coffee in this range, there also is some incredible potential with experimenting with longer brew times. Longer brew times can help increase extraction and lead to some very sweet and flavorful profiles. These longer brew times work best with light to medium roasted coffee and tend to work better with washed coffees. Natural/experimental coffees can have amazing results, but can also be harder to dial in with extended brew times.
6. Press Slowly
How you push down on the AeroPress at the end of your brew can have a big impact on the final cup of coffee. Try pushing very slowly—around a minute total. There is a lot of pressure within the AeroPress as you push. It isn’t as high as espresso but does reach 0.5 – 1 bar of pressure (vs. 0.008 bar during pour over).1 Pushing slowly ensures that the water runs evenly through the grounds without channeling. Channeling is when water finds paths of least resistance in the coffee grounds and prioritizes those paths. This can lead to unwanted astringency in the cup and the impression of over-extraction (since some of the grounds are over-extracted around the channeling, while other grounds are under-extracted).
Pro Tip: If you feel the coffee pushing back, let up and then slowly & gently reapply pressure
The Bottom Line
The AeroPress is a truly amazing brewer with so much flexibility and potential. These six tips are just a few ways to improve your brews. Use them as a starting point to experiment yourself and find parameters that lead to the cups of coffee you like most from the AeroPress.